Have an emergency? Call us now on 07732 234231. Available 24/7 with a 30 minute response time.

Servicing your boiler may seem straightforward, yet the fine details make all the difference for long-term safety and performance. Most people forget this crucial step, but professional inspections can lower annual heating costs by improving efficiency and catching issues early. Neglecting a proper routine means missing out on a longer-lasting, safer heating system than you might expect.
| Key Point | Explanation |
|---|---|
| 1. Prioritise Safety Equipment | Always wear protective eyewear, gloves, and a respiratory mask before starting boiler servicing to ensure your safety from potential hazards. |
| 2. Disconnect Power and Gas | Before servicing, turn off the boiler and disconnect it from its power source and gas supply to prevent accidents. |
| 3. Inspect for Leaks and Pressure | Check all connections and system pressure to identify any leaks or issues that might affect boiler performance. |
| 4. Schedule Regular Professional Maintenance | Arrange annual servicing with a certified engineer to maintain optimal performance and ensure safety compliance for your boiler. |
| 5. Document Findings and Maintenance History | Keep a record of inspections and repairs to track boiler health and anticipate necessary future service requirements. |
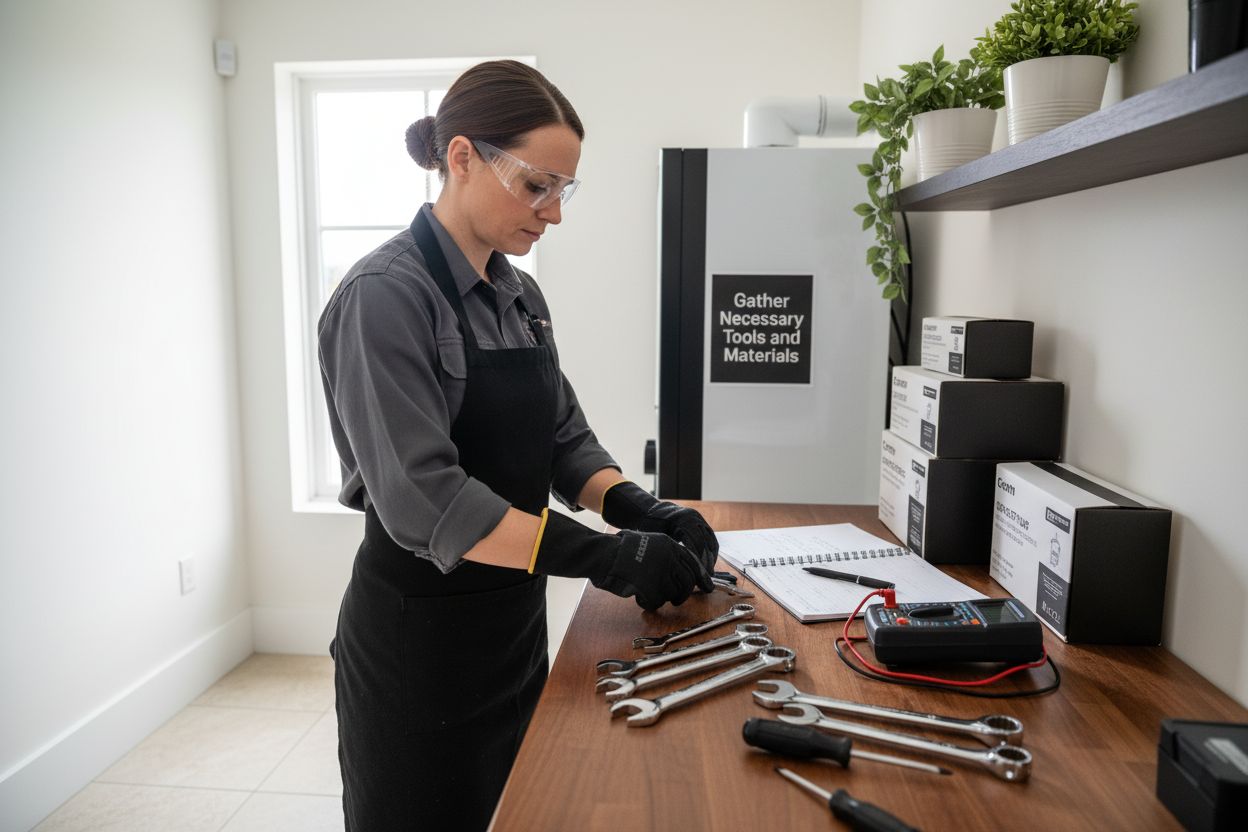
Before diving into boiler servicing, preparing your workspace with the correct tools and materials is crucial for a safe and efficient process. Professional boiler maintenance requires specific equipment that ensures both your safety and the comprehensive inspection of your heating system.
To begin, you will need a comprehensive set of tools designed specifically for boiler servicing. Safety equipment should be your first priority. This includes protective eyewear to shield your eyes from potential debris, durable work gloves to protect your hands, and a respiratory mask to prevent inhaling dust or potentially harmful particles during the service.
Your core toolkit for boiler servicing should include:
Additionally, you will want to have cleaning materials ready. A soft cloth, mild detergent, and compressed air can help remove dust and debris from internal components. Replacement parts such as gaskets, seals, and filters might also be necessary, depending on the condition of your boiler.
Make certain your work area is well-ventilated and clear of unnecessary items. Having a clean, organised workspace not only makes the servicing process smoother but also reduces the risk of accidents. Keep a notepad nearby to document any observations or potential issues you discover during the inspection.
Below is a reference table outlining the essential tools, equipment, and their purposes required for safely and effectively servicing a domestic boiler.
| Tool/Material | Purpose |
|---|---|
| Protective eyewear | Shields eyes from debris and dust |
| Durable work gloves | Protects hands during handling and cleaning |
| Respiratory mask | Prevents inhalation of dust or pollutants |
| Adjustable wrench | Disconnects/reconnects boiler components |
| Screwdriver set | Opens and secures boiler panels |
| Allen key set | Accesses specific boiler mechanisms |
| Multimeter | Electrical testing and diagnostics |
| Flue gas analyser | Checks combustion efficiency |
| Vacuum (narrow nozzle) | Cleans internal components |
| Pressure gauge | Measures system pressure |
| Digital thermometer | Records temperature measurements |
| Soft cloth & mild detergent | Removes dust and light deposits |
| Compressed air | Clears debris from delicate parts |
| Replacement gaskets/seals | Spares for worn or damaged components |
Before commencing, verify that you have disconnected the boiler from its power source. This critical safety step prevents electrical accidents and ensures you can work without risk of unexpected power activation. Remember that if you feel uncertain about any aspect of the servicing process, consulting a Gas Safe registered engineer is always the safest course of action.
Safety is paramount when servicing any heating system, and properly shutting down your boiler is the critical first step in preventing potential electrical or gas-related accidents. This stage requires methodical and careful attention to ensure complete isolation of power and fuel sources before beginning any maintenance work.
Electrical disconnection is your primary safety measure. Locate your home’s main electrical panel and identify the circuit breaker specifically dedicated to the boiler. Carefully switch this breaker to the “off” position, which completely cuts electrical supply to the unit. If your circuit breakers are not clearly labelled, use a circuit tester to confirm you have isolated the correct power source.
For gas boilers, you will need to turn off the gas supply at the main shut-off valve. This valve is typically located near the boiler or at the primary gas entry point to your property. Turn the valve a quarter turn so it sits perpendicular to the gas pipe, which indicates it is fully closed. Never rely solely on the boiler’s internal controls for complete power isolation.
Before proceeding, verify the boiler is completely powered down by attempting to activate any controls or displays. No lights, sounds, or movement should occur when the system is properly disconnected. If you notice any residual electrical activity, double-check your disconnection process and consider consulting a professional.
Additional precautions are crucial. Allow the boiler to cool completely before beginning any servicing work. Hot components can cause serious burns, and internal systems may retain heat even after power disconnection.
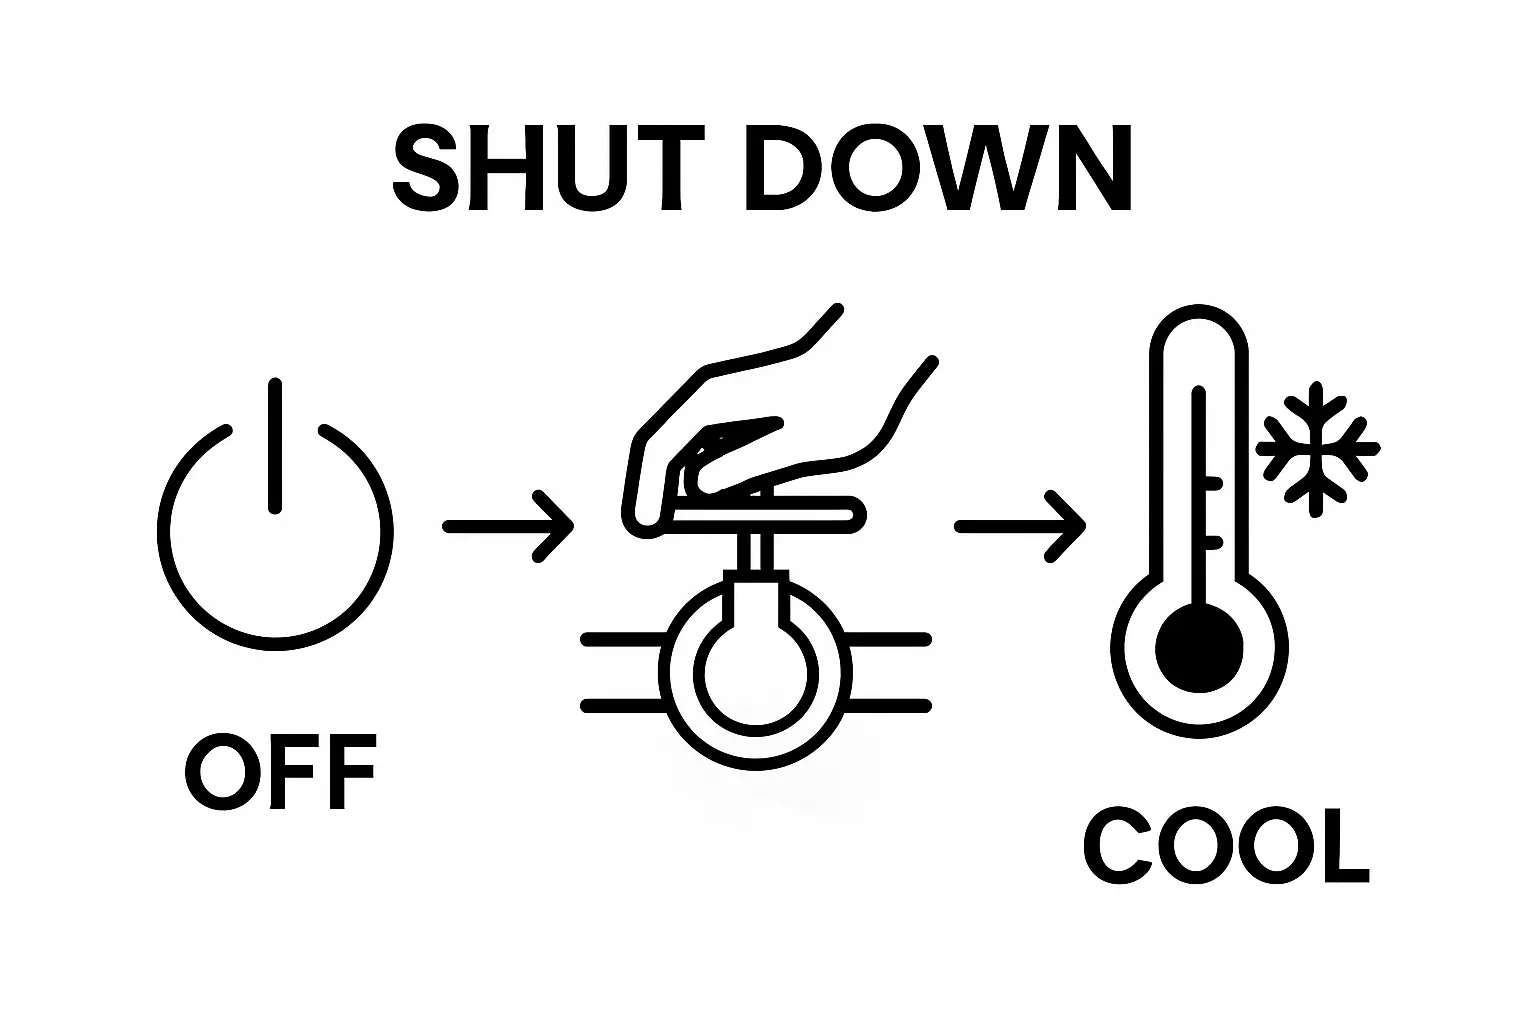 Wait approximately 30-45 minutes to ensure all internal mechanisms have reached a safe temperature.
For those less confident in electrical or gas systems, read more about professional boiler servicing steps to understand when expert intervention might be necessary. While many homeowners can perform basic maintenance, complex systems or older installations might require professional expertise to ensure safe and effective servicing.
Careful inspection and cleaning of boiler components are essential for maintaining optimal performance and preventing potential system failures. This critical step requires methodical attention to detail and a systematic approach to examining each internal mechanism.
Begin by removing the boiler casing carefully, using your screwdriver set to unscrew panel attachments. Work slowly and keep screws organised to ensure easy reassembly. Shine a powerful torch inside the boiler cavity to illuminate all internal components, allowing you to conduct a thorough visual examination. Look for signs of corrosion, mineral buildup, soot accumulation, or any visible damage to pipes, seals, and electrical connections.
The heat exchanger requires particular scrutiny. Mineral scale and debris can significantly reduce heating efficiency and potentially cause long-term damage. Use a soft brush and compressed air to gently remove dust and loose particles. For more stubborn deposits, a specialised cleaning solution designed for boiler systems might be necessary. Avoid using water directly on electrical components, and ensure any cleaning is performed with extreme care.
Pay close attention to the burner and combustion chamber. These areas are prone to soot accumulation, which can impede efficient fuel burning. Carefully vacuum these sections using a narrow nozzle attachment, removing loose debris without disturbing delicate internal mechanisms. Check the burner nozzles for any blockages or irregularities that might affect flame distribution.
Electrical connections demand meticulous inspection. Look for any signs of wear, fraying, or corrosion on wires and connectors. Loose connections can cause significant performance issues and potential safety risks. If you notice any damage, it is advisable to explore professional boiler servicing options to ensure comprehensive repair.
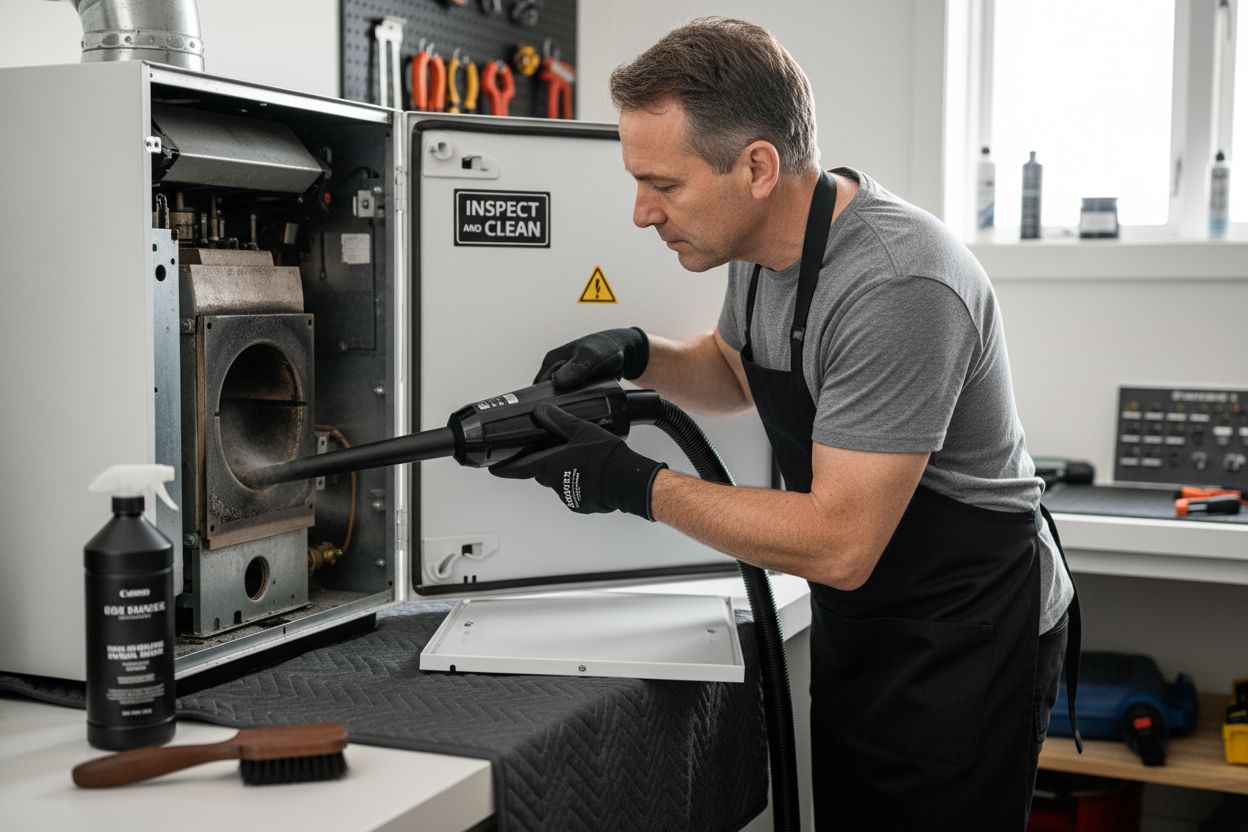
As you complete the inspection, document your findings. Note any areas of concern, minor damages, or components that might require future replacement. This record serves as a valuable reference for future maintenance and can help predict potential issues before they become serious problems. Remember that while thorough cleaning is important, any significant repairs or complex maintenance should be handled by a qualified heating engineer.
Detecting leaks and verifying system pressure are crucial components of boiler servicing that directly impact your heating system’s efficiency and longevity. This step requires careful observation and precise measurement to ensure your boiler operates safely and effectively.
Visual leak detection is your first line of investigation. Carefully examine all pipe connections, seals, and joints for any signs of moisture, corrosion, or water staining. Pay particular attention to areas around pipe connections, valves, and the base of the boiler. Even small droplets or slight dampness can indicate potential structural weaknesses that might develop into more significant problems if left unaddressed.
To conduct a comprehensive pressure test, you will need a reliable pressure gauge. Locate the pressure gauge on your boiler system, which is typically situated on the front panel or nearby pipework. Most residential heating systems should maintain a pressure between 1 and 1.5 bar when the system is cold. Pressure outside this range signals potential issues. If the pressure reads below 1 bar, your system might have a slow leak or require bleeding. Conversely, pressure above 1.5 bar could indicate over-pressurisation, which can strain internal components.
Pressure testing involves several critical observations. Slowly repressurise the system using the filling loop, watching the gauge carefully. Add water incrementally, allowing the system to stabilise between additions. Listen for any unusual sounds during this process, such as hissing or gurgling, which might suggest air pockets or potential leak points.
While performing your pressure assessment, inspect expansion vessels and pressure relief valves. These components play a vital role in maintaining system balance. A malfunctioning expansion vessel can cause pressure fluctuations that compromise your boiler’s performance. Look for any signs of corrosion, mechanical damage, or unusual wear that might necessitate professional intervention.
Learn more about comprehensive boiler maintenance techniques to understand when home servicing reaches its limits. Some pressure and leak issues require specialist diagnostic equipment and expertise. If you discover persistent pressure drops or complex leak patterns, consulting a professional heating engineer becomes not just advisable, but essential for your system’s long-term health and safety.
Reconnecting power and thoroughly testing your boiler’s functionality is the culmination of your servicing efforts, representing a critical phase where all your previous work is validated. This step demands methodical attention and careful observation to ensure your heating system operates safely and efficiently.
Systematic reconnection is paramount. Begin by carefully replacing the boiler casing, ensuring all screws are securely fastened and panels are correctly aligned. Slowly restore power at the main electrical circuit breaker, watching for any immediate warning lights or unusual electrical activity. Return the gas supply valve to its original open position, making certain the movement is smooth and complete.
Initiate a comprehensive system test by activating your boiler’s primary controls. Observe the startup sequence carefully, listening for any unexpected sounds such as grinding, clicking, or prolonged stuttering that might indicate mechanical issues. Pay close attention to the ignition process, watching the flame pattern to confirm it is steady, blue, and uniform. An irregular or yellow flame could signal combustion problems requiring professional intervention.
Temperature and pressure monitoring are crucial during this initial test phase. Allow the system to run for approximately 10-15 minutes, tracking how quickly it reaches the desired temperature and whether heat distribution remains consistent across radiators. Check that thermostatic controls respond accurately, with temperature adjustments reflecting immediate changes in system output.
According to Health and Safety Executive guidelines, comprehensive functional testing should include verifying all safety mechanisms. This means checking pressure relief valves, examining flue gas emissions, and ensuring no carbon monoxide leakage. While some aspects might require professional equipment, homeowners can perform basic visual and auditory assessments.
During your final evaluation, document any observations or slight irregularities. Even minor performance variations could indicate future maintenance requirements. Your meticulous approach during this final step transforms a routine service into a proactive maintenance strategy, potentially extending your boiler’s operational lifespan and preventing costly future repairs.
The table below gives a step-by-step overview of the main servicing stages, estimated time required, and key outcomes for each task as covered in the guide.
| Step | Estimated Time | Key Outcome |
|---|---|---|
| Gather tools and prepare workspace | 10-15 minutes | Organised, safe environment and correct equipment |
| Turn off boiler and disconnect power/gas | 5-10 minutes | Safe isolation, no power or gas risk |
| Inspect and clean boiler components | 30-60 minutes | Debris removed, major faults identified |
| Check for leaks and test pressure | 15-20 minutes | Leak detection and correct pressure verified |
| Reconnect power and test functionality | 10-20 minutes | Safe operation and stable system performance |
| Schedule ongoing professional maintenance | 5-10 minutes | Long-term reliability and servicing record started |
Regular maintenance visits are the cornerstone of long-term boiler health, transforming a one-time service into a comprehensive strategy for system reliability and efficiency. Professional inspections go far beyond what homeowners can typically achieve during a basic home service, providing deep diagnostic insights that prevent potential catastrophic failures.
Establishing a consistent maintenance schedule requires strategic planning. Most manufacturers recommend annual professional servicing, but the specific frequency can vary depending on your boiler’s age, model, and usage patterns. Older systems or those experiencing higher thermal stress might benefit from more frequent professional assessments. During these visits, certified engineers conduct thorough examinations that include advanced diagnostic testing, precision calibration, and comprehensive component evaluation.
Documentation becomes your maintenance roadmap. Create a dedicated file to track all service history, recording dates of previous inspections, identified issues, repairs completed, and recommended future interventions. This systematic approach helps you anticipate potential problems and provides valuable evidence for warranty claims or future property assessments. Maintain copies of service reports, allowing you to build a comprehensive maintenance narrative for your heating system.
Consider the broader implications of regular servicing. Beyond mechanical integrity, professional maintenance directly impacts energy efficiency, potentially reducing your annual heating costs by ensuring optimal system performance. Engineers can identify minor inefficiencies that, if left unchecked, could lead to significant energy waste and increased utility expenses.
Learn more about recommended boiler servicing frequencies to understand the nuanced requirements for different heating systems. While annual servicing represents a standard recommendation, your specific circumstances might demand a more tailored approach. Factors such as boiler age, manufacturer specifications, and individual household requirements can influence the ideal maintenance interval.
Ultimately, scheduling regular maintenance visits is an investment in your home’s comfort, safety, and long-term operational efficiency. By prioritising professional inspections, you transform reactive repair strategies into proactive system management, ensuring reliable heating and potentially extending your boiler’s functional lifespan by several years.
You have just learned the step-by-step process of boiler maintenance, from safely preparing your tools to performing inspections and pressure checks. Still, even the most thorough DIY approach has its limits. Uncertainty about electrical disconnection, hidden leaks, or complicated diagnostics can put your safety and system’s longevity at risk. When you want full confidence in your boiler’s reliability and year-round comfort, professional support is essential.

Why wait and worry about missed details or potential breakdowns? With over 18 years of trusted expertise, Skan Heating & Plumbing delivers certified servicing, responsive emergency support, and proven solutions for both households and businesses in Portsmouth, Waterlooville, and beyond. Let our team handle everything from comprehensive boiler maintenance to urgent repairs, so you enjoy peace of mind and top performance every winter. Secure your next maintenance visit easily or reach out for rapid help at https://skanheating.co.uk today.
Annual professional servicing is recommended for most boilers. However, older systems or those under heavy use may require more frequent inspections.
Essential tools for boiler servicing include an adjustable wrench, screwdriver set, multimeter, flue gas analyser, vacuum cleaner, pressure gauge, and digital thermometer. Safety gear like protective eyewear and gloves is also critical.
Check for signs of moisture, corrosion, or water staining around pipe connections, seals, and joints. Even small droplets can indicate potential leaks that require attention.
If the pressure is below 1 bar, your system may need bleeding or could have a slow leak. If it’s above 1.5 bar, it could be over-pressurised, indicating potential issues that need professional evaluation.